Configuring your Mac Kiosk
Once eCrisper is running, you can display the Preferences window by pressing the command key and the comma key (,) at the same time. When asked for a password, press the return key.
Kiosk ID: This can be anything that suits your organization. If a central user database is used, each session recorded in the database will include the kiosk id.
Password: This is the password required to display the preferences window. Check Display to see the password in clear text. A password is only required when a valid license is present. The default password is password.
(Removed) Machine ID: This generated ID is unique to each Mac computer and is required to purchase a license. This ensures that each license only works for the computer it was purchased for.
Maximum # windows: This value limits the number of web browser windows that can be be opened at any given time. It is used to prevent users from trying to crash the computer by opening thousands of windows.
Inactivity timeout: This is the number of minutes without keyboard or mouse activity before the system closes the session and returns to the initial state. You have the option to display a warning if a session is in progress. If “Show warning” is checked, a “Do you really want to quit?” message will be displayed for 15 seconds before closing the session in case the user is still present.
End of session – Warn user at: If Warn user at is checked, the timer will turn red at the specified number of seconds before the end of the session. This is used to draw attention to the timer.
Delete cookies: Check this value to delete all cookies at the end of each session. This should always be checked for public access kiosks but probably not on your personal computer.
Clear pasteboard: Check this value to clear the pasteboard (clipboard) at the end of each session. This should always be checked for public access kiosks but probably not on your personal computer.
Delete cache: Check this value to delete the cache at the end of each session.
Hide cursor: This is meant for touchscreen kiosks only.
Browsing log: Enable this feature if you want a log of visited websites to be created. Only the part before the “?” in the URL will be saved to exclude private data. The log file is saved as:
~/Library/Application Support/eCrisper/Browsing.log
Search from URL: When this value is checked, the user can perform a Google search from the URL text field.
User agent: When you visit a webpage, your browser sends the user-agent string to the server hosting the site that you are visiting. This string indicates which browser you are using, its version number, and details about your system, such as operating system and version. The web server can use this information to provide content that is tailored for your specific browser.
Delay before loading webviews: When restarting the computer with the kiosk mode enabled, eCrisper is launched automatically when rebooting. In some cases eCrisper might be finished loading before the Internet connection is ready. In that case it is a good idea to delay loading the initial web pages.
Printing orientation: Select Portrait or Landscape for printing.
Printing scale: Lets you shrink or enlarge pages when you print..
Printing margins: Select printing margins – 72 points = 1 inch = 2.54 cm. Note that your printer may not be able to print all the way to 0.
Print panel: Check Display if you wish the users to be presented with the Print panel when clicking on the print button. You can also choose to allow users to print specific pages by checking Include page range.
Start Kiosk Mode: If you click on this button, eCrisper will be added to a list of applications Mac OS X launches after a successful login and then makes sure that it is always running. Clicking on Return to Desktop will cancel the kiosk mode and allow you access to the Desktop.
Warning: After you change the password, test it at least once before setting using the Start Kiosk Mode button. When it is in kiosk mode, your only way out is through the Preferences window. Even rebooting would not save you.

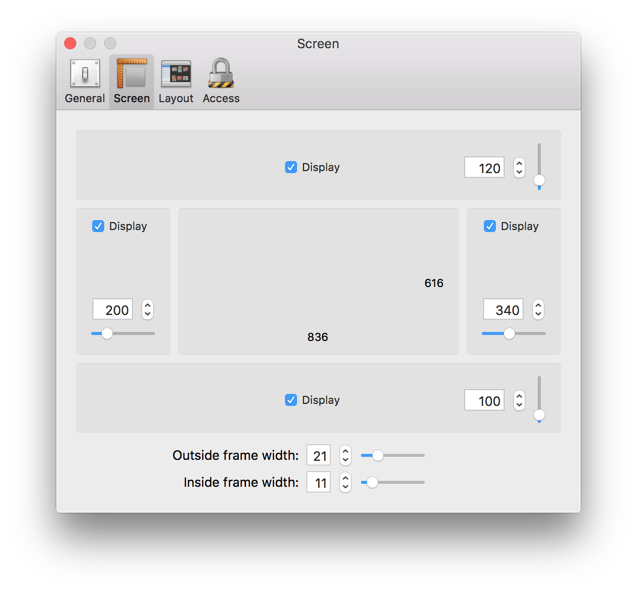
Your screen is divided into 5 areas. Each area can be resized or hidden. You can also change the width of the frame both outside frame and inside frame. Like most settings, you will see the changes applied right away as you make them.

In the layout section, some of the values are followed by a small globe to indicate that a value is required for each language available.
Languages can be added, removed, or edited by clicking on the Edit button at the bottom of the window.
The first language in the list will be used as the default language that the system will return to after each user. Languages can be re-ordered by dragging them into the right position.
The language currently being edited is displayed at the bottom of the screen.

The 5 areas on the screen have one thing in common, they can all display rich web content using a webview. Each webview has the following settings:
Display webview: For each area you can choose not to display the webview.
URL: This is the location of the web page to be displayed. It can be either local (file://) or on a web server (http://). A different URL can be specified for each language.
Tip: If you change the URL and you want the change to be visible right away, uncheck then re-check Display webview. This will load the new page.
Navigation: Choose where the new web page opens when a user clicks on a link on a webview. You can select from the following 4 options:
- None – no navigation occurs
- Self – within the same webview that was clicked
- Center – main browser
- New window – a new web browser window is opened
For the center webview, Self and Center would be the same so only Self is displayed.
New window: This is exactly the same as Navigation above, except that it applies to links that have a new window target in the HTML (links that would open a new window if using a regular web browser such as Safari).
Scrollbars – Display: Check this value if you want the scrollbars to be displayed. Note that if you uncheck this value, the scrollbars will disappear right away. But to re-display them, you might need to restart eCrisper.
Busy indicator on web page – Display: Check this value if you want a busy indicator to be displayed on top of the webview while a page is being downloaded. For the main center webview, this replaces the busy indicator displayed on the toolbar.
Style Sheet: You can specify a style sheet that will be applied to all web pages displayed in the webview. For example, this can be used to zoom all web pages to 130%.
The possibility to include web content in any of the 5 areas on the screen allows you to be as creative as you want. Since the web content is kept behind other objects such as the title for the top area or buttons for the side and bottom areas, web content can be used to display a background.
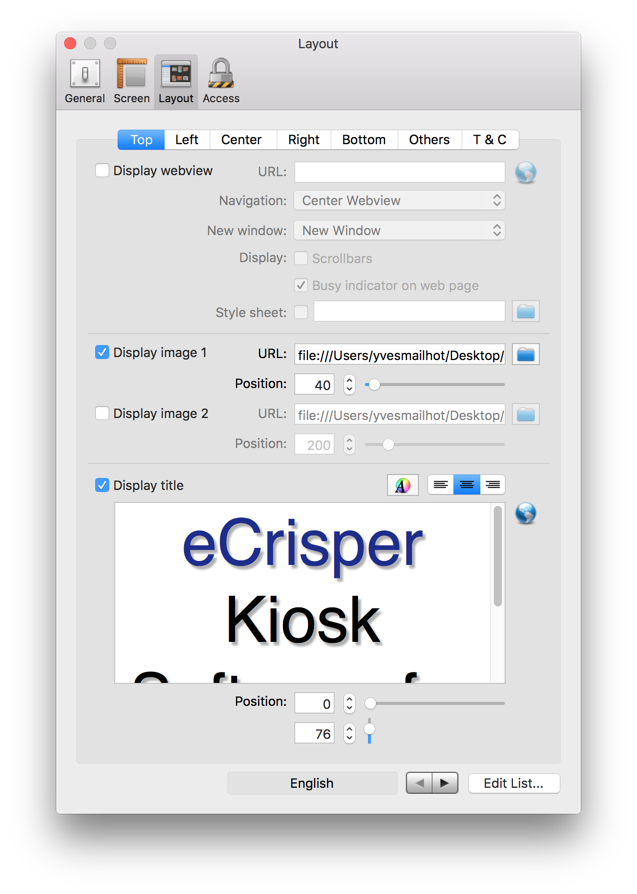
You can display two images in the top area. Like all the images displayed in eCrisper, you have to specify a valid URL starting with file:// if an image is stored on a local drive, or http:// if an image is retrieved from a web server. The two images will always be vertically centered but you can specify the horizontal position.
You can also display a rich text title including different fonts, colors, and even shadows (you may have to make the Fonts window wider to see the shadow options).

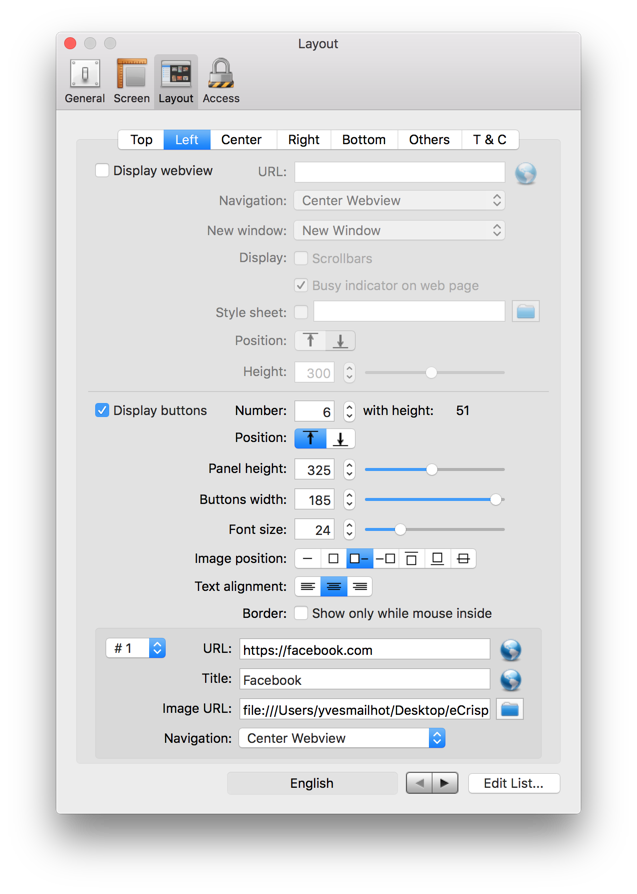
The left and right webviews have additional settings – height and position (top or bottom).
Each side can display a button panel with up to 20 buttons. As for the webview, you can specify the height of the panel and the position.
To configure a button, select the button # (1 – 20). Each button needs the URL of the page that is to be opened when the user clicks on that button, a title, an optional image URL, and where the page is to be opened (navigation). A different title and URL can be used for each language.
A page can be opened in Self, meaning in the webview in the corresponding side box, in the center webview, or in a new window.

The central webview is the main web browser and can include a toolbar and a statusbar.
Font size buttons: These buttons allow users change the size of the font.
Home button: This button will open the web page specified under the Others tab.
Print button: Web pages will be sent to the default printer when this button is clicked.
URL Field and place holder: When Google searches can be done from the URL field, the place holder is the text displayed when the URL field is empty.
Find field: This field is used to find occurrences of text in a web page.
Display frame: It is sometimes useful to remove the frame around the central webview for example if you want the webview to occupy the entire screen. It is also useful if you want the center webview to be perfectly aligned with the other webview since they don’t have a frame.

Login box: The login box is automatically displayed when you select the Access Mode Using accounts.
Font size: This font size is applied to the language button, the timer, and the quit button. The width of these objects will adjust to the font size and to the text width.
Free unlimited – display: When selecting the Access Mode Free unlimited, you can choose not to display the timer and the quit button.

Windows: These values apply to web browser windows. The size and position will be used as the default values when a link or a button opens a new browser window. Click on the Center button to compute the center of the screen given the size you specified.
Home page: This URL is used by both Home buttons, the one on the center webview and the one on the web browser windows.
Google language code: This makes sure the user sees the Google page in the selected language. You will find a list of language codes at http://sites.google.com/site/tomihasa/google-language-codes.
Alert messages: You have control over every text and image displayed to the users in every language.

You can show the user the terms and conditions at the beginning of a session. The user must click on Accept within 30 seconds or the session will end. The text is displayed in the language selected by the user before the session was started.

Access mode: You can choose one of three access modes:
Free unlimited: A session starts as soon as a user clicks on a link or a button. If the timer is displayed, it increments every second starting with 00:00:00 and never ends unless the user clicks on the Quit button or allows the session to timeout due to inactivity.
Free but limited to: A session starts as soon as a user clicks on a link or a button. The timer starts with the specified number of minutes and is decremented every second until it reaches 00:00:00. A session may end because the user clicks on the Quit button, because the balance reaches 00:00:00, or because of an inactivity timeout.
Using accounts: When a user enters a valid username and password, the account balance is retrieved from the database and displayed on the timer. When the session ends, the database is updated with the new balance and the account can be used again in the future. A session may end because the user clicks on the Quit button, because the balance reaches 00:00:00, or because of an inactivity timeout.
Instead of a username/password combination, you can choose to only request a username by unchecking Display for Password field.
When using accounts, you can also specify some websites to be free by checking Free websites and adding domains to the list. For example adding apple.com would give access to the entire Apple website.
Some interesting links related to using a user database:
Website restrictions
You can choose one of three website restrictions modes:
- Unrestricted access
- Block some sites
- Only allow some sites
Click on the Edit list button to add, remove, or edit entries in the list.
The filter can either apply to the host portion of a URL (the domain) only or to the entire URL. For example, the host portion for http://ecrisper.com/blog is ecrisper.com.
The text added to the list only has to be found somewhere in the host portion or in the URL for a match to occur. Do not use * for wild cards, it is doing it by default.
If a page is rejected by the filter, an entry will be added in the log file to show you exactly the URL that caused the rejection. This will help you fine tune the filter.
eCrisper also works with Parental controls (included with Mac OS X) or third party filters such as Netnanny.
Disable
To make your kiosks more secure, you should disable any URL that start with file:// and ftp://.
Some websites allow users to upload files. To prevent the file selection panel from being displayed check File uploads.
